How to Install Peel and Stick Wood Paneling Like a Pro

Introduction
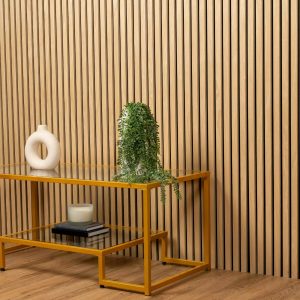
Dreaming of a stylish, natural-looking wall without the mess or cost of traditional construction? Peel and Stick Wood Paneling is your answer. This modern, hassle-free solution makes it easy to upgrade your space with real wood texture in just hours. Whether you’re a first-time DIYer or a seasoned home renovator, Peel and stick wood paneling offers the perfect balance of convenience, beauty, and durability. At SlatSolution, we’ve made it our mission to help you achieve professional-quality results with minimal effort. Ready to transform your home? Let’s dive into how to install Peel and Stick Wood Paneling like a pro.
Why Choose Peel and Stick Wood Paneling?
Peel and Stick Wood Paneling has become one of the most popular home improvement materials for good reason. It’s designed for simple installation and incredible results, giving you the look of custom woodwork without special tools or labor costs.
Fast, Easy Installation
Unlike traditional wood planks that require nails, glue, and hours of work, Peel and Stick Wood Paneling comes with a strong adhesive backing. All you need to do is peel off the liner, align the panel, and press it onto the wall.
Stylish and Versatile
From rustic barnwood to sleek modern finishes, Peel and Stick Wood Paneling complements every interior style. It’s perfect for accent walls, ceilings, furniture, and even small decorative projects.
Affordable Transformation
With Peel and Stick Wood Paneling, you can refresh your home without a hefty renovation budget. It’s cost-effective, low-maintenance, and long-lasting — a smart investment in both style and practicality.
Tools and Materials You’ll Need
Before starting your project, gather these essentials for smooth installation:
- Measuring tape
- Level
- Utility knife or saw
- Pencil or chalk line
- Cleaning cloth
- Roller or firm press tool
Having these items on hand will ensure your Peel and Stick Wood Paneling project looks flawless and stays secure.
Step-by-Step Installation Guide
Installing Peel and Stick Wood Paneling is easier than you might think. Follow these steps to achieve a professional finish.
Step 1: Prepare Your Surface
Start by cleaning the wall thoroughly. Remove dust, grease, or debris that could interfere with adhesion. Peel and Stick Wood Paneling works best on smooth, dry surfaces — such as painted drywall, plywood, or tile. Avoid applying it to uneven or textured walls.
Step 2: Measure and Plan Your Layout
Measure the wall and mark guidelines using a level and pencil. This step ensures your panels align evenly. Dry-fit a few panels on the floor first to visualize the pattern and confirm placement. Proper planning is key to achieving a polished look.
Step 3: Peel and Stick
Now for the fun part! Peel off the adhesive backing from your first piece of Peel and Stick Wood Paneling and carefully press it onto the wall. Start from the bottom and work your way up, pressing firmly as you go to eliminate air bubbles. Use a roller to reinforce adhesion.
Step 4: Trim for a Perfect Fit
When you reach corners or outlets, measure carefully and trim your Peel and Stick Wood Paneling with a utility knife or saw. This ensures each piece fits precisely, giving your wall a seamless, professional appearance.
Step 5: Finishing Touches
Once all panels are in place, inspect for any loose edges and press them firmly. Wipe down the surface with a soft cloth to remove dust or fingerprints. Congratulations — your new feature wall is complete!
Pro Tips for the Best Results
Even though Peel and Stick Wood Paneling is simple to use, these expert tips can help elevate your installation.
- Acclimate panels: Let your Peel and Stick Wood Paneling sit in the room for 24 hours before installation to adjust to temperature and humidity.
- Work slowly: Align each piece carefully to maintain straight lines.
- Mix panels: Blend panels from different boxes to create a more natural, varied wood look.
- Use a roller: Apply firm pressure to ensure the adhesive bonds fully.
- Seal edges: In moisture-prone areas like kitchens or bathrooms, consider sealing edges for added protection.
Where to Install Peel and Stick Wood Paneling
The possibilities are endless. You can use Peel and Stick Wood Paneling to transform nearly any room in your home.
Living Rooms
Create an eye-catching accent wall or highlight your fireplace with Peel and Stick Wood Paneling. The texture and warmth instantly enhance your space.
Bedrooms
Add Peel and Stick Wood Paneling behind your bed to design a cozy headboard or create a feature wall that sets the mood for relaxation.
Kitchens and Bathrooms
With proper sealing, Peel and Stick Wood Paneling can make a stylish backsplash or vanity accent. It brings natural warmth to even the smallest spaces.
Offices and Hallways
Turn blank walls into works of art with Peel and Stick Wood Paneling. It adds depth, professionalism, and a designer touch to any area.
Maintenance and Longevity
Maintaining your Peel and Stick Wood Paneling is easy. Simply dust or wipe with a damp cloth as needed. Because it’s made with durable materials, it resists warping and fading — keeping your space beautiful for years. With minimal upkeep, you’ll enjoy the look of real wood without the maintenance headaches.
Conclusion
Installing Peel and Stick Wood Paneling is one of the easiest and most rewarding DIY projects you can tackle. With just a few tools and a free afternoon, you can completely transform any room in your home. At SlatSolution, we’re passionate about helping homeowners create stylish, timeless spaces with minimal effort. So grab your panels, follow these steps, and discover how simple it is to install Peel and Stick Wood Paneling like a pro. Your walls — and your guests — will thank you.


Post Comment